- April 11, 2015
- Gloribell Lebron
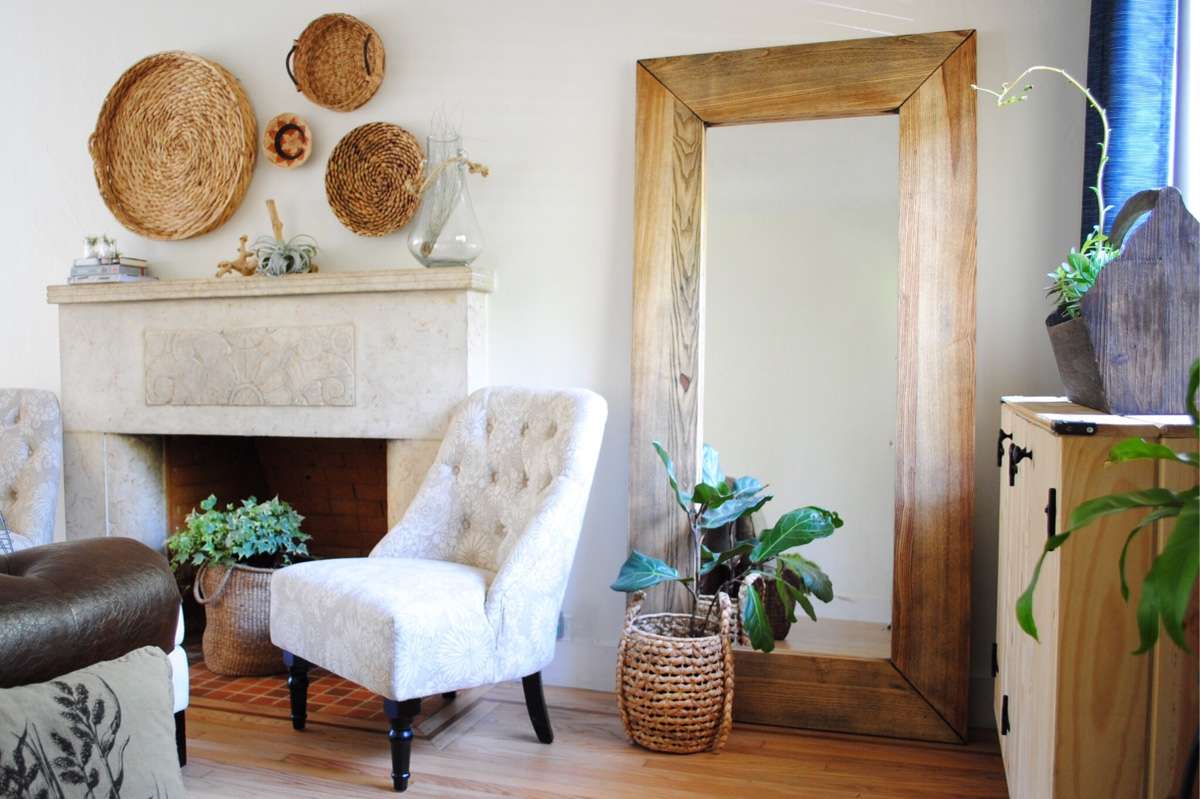
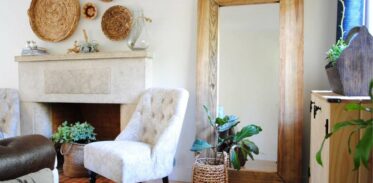
Dark pieces of furniture can sometimes make the room seem smaller or crowded.
This was the case of my Ikea “Mongstad” mirror. It was the best companion to the end of our hallway in the old apartment for years, helping this area feel ample. But now that we live in a house, I couldn’t find the right spot for it.
After giving it a thought, I decided to try sanding this mirror but knowing that it wasn’t real wood. Before embarking in this project, I first tested it on the back to see how this material will react to the sanding machine. I was impressed to find that it looked like real wood.
After sanding for a couple of minutes, I gave this piece a light tint, and I’m proud to say it looks amazing!
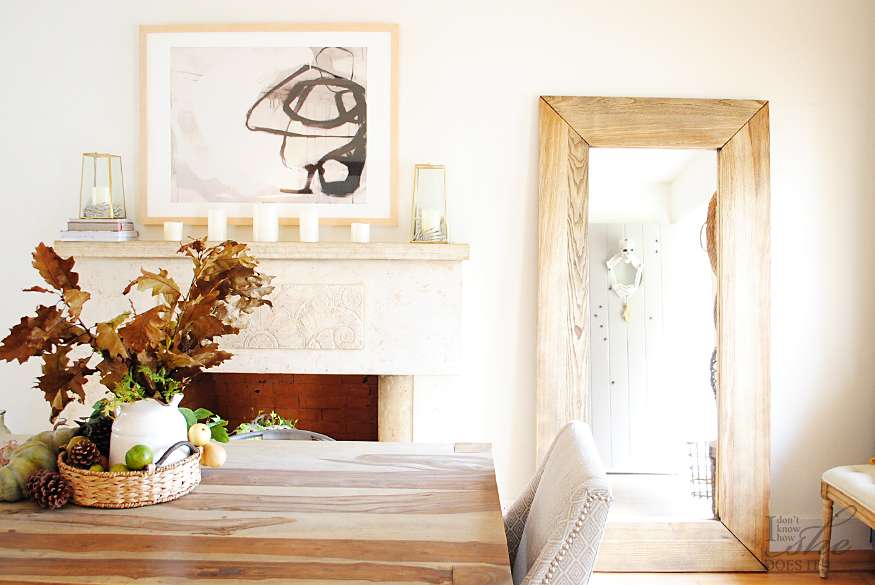
I love the final result, and it goes perfectly well with my fireplace and my wood floor. Don’t you think it is a truly miracle? This goes to prove that sometimes in life, one has to take risks.
About G. Lebron Interiors

Unknown
| 28 September 2015Great post – this is *exactly* what I was looking for – down to the stain color!!!! It really looks amazing! Would you mind sharing the exact stain brand/color so that I can full-on copy you??? Thanks so much!
Gloribell Lebron
| 28 September 2015Hi there! Good morning everyone! The #WoodStain I used for this mirror is #Varathane #wood stain in #Golden #Oak color from @homedepot (#LetsDoThis). I removed the old paint with a @RyobiPowerTools Random Orbit Sander using a 60 grit #Diablo #sandpaper and to finish it, a 200 grit one. Please let me know if you have any other questions and have a great #Saturday!
Eden
| 24 December 2019That mirror was black an you got it that light wood color?
Gloribell Lebron
| 26 December 2019Hi there Eden! Yes, this mirror was dark brown and by sanding it and staining, I gave it another look. Thanks for stopping by.
Pham Linh
| 5 January 2016Furniture is really a important element of an office and home which add style and beauty.Thanks for sharing this beautiful Furniture.
Tom Brady
| 1 April 2016The house become more beautiful due to the furniture. Your post is great! Thank the author!
Kaitlyn Pacada
| 16 November 2017Hi! I started sanding the back of my mongstad mirror to test out a spot before sanding the whole mirror. The black color is coming off but underneath doesn’t look like wood. It will looks like compressed wood or something. Do I need to sand deeper? You mirror has visible wood grain on it but I’m not seeing that on mine.
Gloribell Lebron
| 16 November 2017Hello there! For this project I used a fine grade sanding paper (120-150). This only remove the top coat on the mirror’s frame. Still, if I were to sand to harshly in certain areas, I would get the underneath compress wood (and this happened to me). Another product I recently discover was the CitriStrip. Although I didn’t use this on my Ikea mirror, I’ve used it on both wood and compress materials and it had worked wonderful. Hope this helps, if not, please let me know. I’ll be more than happy to help!
Vannia Enriquez
| 7 October 2018How did your do the inner areas closest to the mirror?
Gloribell Lebron
| 8 October 2018Hi! I used a small piece of sanding paper around this part. Also, I blue taped all the mirror in this area prior to sanding.
R Boro
| 17 August 2019Ive tried doing this recently and there is no way to take off the top coat and still see the wood grain finish. The description above first says 60 grit then 200 grit, and then it says 120-150 in a post below. Ive tried doing it countless ways using the Random Orbit Sander and it doesnt work. There is no way this is real…
Gloribell Lebron
| 17 August 2019Hi there! I’m so sorry you are not achieving this looks based on this tutorial. I did this many years ago and it worked on my old Ikea mirror. Perhaps they’ve changed the material or finish they’re using nowadays. I bought this mirror around 2008.
Annie Long
| 9 October 2019Thank you so much for sharing this. I just tested my mongstad mirror and the back was particle board but the side and front is vaneer! I’m super excited and can’t wait to see how this turns out! Hopefully as beautiful as yours…
Gloribell Lebron
| 15 October 2019Hi there! I’m so happy to read this message. Yes, I was fascinated by the outcome of this project. Please keep me posted on yours!
Tiffany Husser
| 19 February 2020I’m amazed to find this! I have this same mirror and, like you, my style has changed! I refurbish a lot of furniture but have been scared to attempt this mirror not knowing if it’s real wood. Sounds like the key is to be very gentle…think I’ll go for it! Thank you!
Gloribell Lebron
| 22 February 2020So happy to have served as an inspiration! Hope it all goes well with your project and please keep me posted. If you’re on Instagram, please tag me (@knowhowshedoesit) so I can have a look 😉
Aida
| 9 May 2020Hello Gloribell , thank you so much for this tutorial. I’m literally about to embark on this up cycle today. I was confused which sandpaper to use – first you said 60 grit then 120-150 ? Which is best? Like you I purchased this mirror 2007/08 so I think we will have the same materials. Many thanks for your help. I will follow you from my insta home account inside_no.321 and let you know how it goes.
Gloribell Lebron
| 9 May 2020Hi there! This is such an old DIY so my apologies if I cannot provide you with accurate responses. But if I’m not mistaken, I used first the hard sandpaper to remove the top paint coat and then the soft sandpaper for a subtle finish in the wood. I’m pretty sure I cleaned all the dust before moving on to the stain. Please make sure to do a sandpaper test on an area that is not visible just in case. Hope it all goes well with this project and please keep me posted.
Thank you so much for writing and for your support.
Linzi
| 3 June 2020I bought this mirror second hand specifically to do this project and it turned out beautifully! Thanks for the inspo!
Gloribell Lebron
| 3 June 2020So happy to read this! Thank you for sharing your experience.
Kikizinha
| 11 June 2020Did you use the same techniques that Gloribell mentioned above? I’ve been sitting on this mirror for years and I hope I can do the same.
Tina
| 26 October 2020Thank you for the inspiration. We did it and it worked!
Gloribell Lebron
| 31 March 2021So happy to read this. Thanks for stopping by!
Patricia L.
| 31 March 2021I found your project two days ago, and did it today!! I love my ikea mirror again lol! I was nervous that once sanded it wouldn’t look like real wood, but it does, it looks really really good!! Thank you for this!!
Gloribell Lebron
| 31 March 2021I’m so happy you did this! It was a total transformation not only to the mirror, but also the entire space. Thanks for sharing this.
Kara
| 22 July 2021Hello,When you sanded the veneer did you sand the dark brown completely off or did you just lightly sand to fade it?
Gloribell Lebron
| 22 July 2021Hi! I sand the brown completely off.
RK
| 3 October 2021I have this exact same mirror with the date stamp on it in the same year. I just sanded the back and it is particleboard through one through I don’t even want to test the front. So strange that you were able to get a wood grain
Sofia
| 16 May 2024Hi, I started my project, not knowing someone else did it already, I see your pics, oh I am waiting to see mine.
I had added using the 200 grid, still see some dark veneers, how much should I keep sanding it, I am not sure!